Using the GMSH Python API to generate complex meshes
In this tutorial, we will use the gmsh API to generate complex meshes. We will in this tutorial learn how to make the 3D mesh used in the DFG 3D laminar benchmark.
The first part of this tutorial can be completed with the ghcr.io/jorgensd/jorgensd.github.io:main docker image, as described in the pygmsh tutorial.
For the second and third part of the tutorial, dolfinx is required. You can obtain a jupyter-lab image with dolfinx/lab:v0.10.0 and a normal docker image with dolfinx/dolfinx:v0.10.0.
This tutorial can be downloaded as a Python-file or as a Jupyter notebook.
1. How to create a 3D mesh with physical tags with the GMSH python API.
We start by import the gmsh module, and initializing the Python API. NOTE: This has to be done in order to run any function in the GMSH API.
from dolfinx.io import XDMFFile
from dolfinx.mesh import meshtags_from_entities
from dolfinx.cpp.mesh import cell_entity_type
from dolfinx.io import distribute_entity_data
from dolfinx.graph import adjacencylist
from dolfinx.mesh import create_mesh
from dolfinx.cpp.mesh import to_type
from dolfinx.cpp.io import perm_gmsh
import numpy
from mpi4py import MPI
from dolfinx.io.gmsh import (
    model_to_mesh,
    extract_geometry,
    extract_topology_and_markers,
    ufl_mesh,
    read_from_msh,
)
import numpy as np
import gmsh
import warnings
warnings.filterwarnings("ignore")
gmsh.initialize()
The next step is to create the rectangular channel of the benchmark. In GMSH, there are two kernels for geometry computations; the built_in kernel ( gmsh.model.geo),
and the OpenCascade kernel (gmsh.model.opencascade). In this tutorial, we will use the the occ kernel, as it is better suited.
Other demos of the usage of the gmsh python API can be found in their GitLab repository.
gmsh.model.add("DFG 3D")
L, B, H, r = 2.5, 0.41, 0.41, 0.05
channel = gmsh.model.occ.addBox(0, 0, 0, L, B, H)
The next step is to create the cylinder, which is done in the following way
cylinder = gmsh.model.occ.addCylinder(0.5, 0, 0.2, 0, B, 0, r)
where the first three arguments describes the (x,y,z) coordinate of the center of the first circular face.
The next three arguments describes the axis of height of the cylinder, in this case, it is (0,0.41,0).
The final parameter is the radius of the cylinder.
We have now created two geometrical objects, that each can be meshed with GMSH.
However, we are only interested in the fluid volume in the channel, which would be the channel excluding the sphere.
We use the GMSH command BooleanDifference for this
fluid = gmsh.model.occ.cut([(3, channel)], [(3, cylinder)])
where the first argument [(3, channel)]is a list of tuples, where the first argument is the geometrical dimension of the entity (Point=0, Line=1, Surface=2, Volume=3)
and channel is a unique integer identifying the channel. Similarly, the second argument is the list of tuples of entities we would like to exclude from the newly created fluid volume.
The next step is to tag physical entities, such as the fluid volume, and inlets, outlets, channel walls and obstacle walls.
We start by finding the volumes, which after the cut-operation is only the fluid volume. We could have kept the other volumes by supply keyword arguments to the cutoperation.
See the GMSH Python API for more information. We also need to synchronize the CAD module before tagging entities.
gmsh.model.occ.synchronize()
volumes = gmsh.model.getEntities(dim=3)
assert volumes == fluid[0]
fluid_marker = 11
gmsh.model.addPhysicalGroup(volumes[0][0], [volumes[0][1]], fluid_marker)
gmsh.model.setPhysicalName(volumes[0][0], fluid_marker, "Fluid volume")
For the surfaces, we start by finding all surfaces, and then compute the geometrical center such that we can indentify which are inlets, outlets, walls and the obstacle. As the walls will consist of multiple surfaces, and the obstacle is circular, we need to find all entites before addin the physical group.
surfaces = gmsh.model.occ.getEntities(dim=2)
inlet_marker, outlet_marker, wall_marker, obstacle_marker = 1, 3, 5, 7
walls = []
obstacles = []
for surface in surfaces:
    com = gmsh.model.occ.getCenterOfMass(surface[0], surface[1])
    if np.allclose(com, [0, B / 2, H / 2]):
        gmsh.model.addPhysicalGroup(surface[0], [surface[1]], inlet_marker)
        inlet = surface[1]
        gmsh.model.setPhysicalName(surface[0], inlet_marker, "Fluid inlet")
    elif np.allclose(com, [L, B / 2, H / 2]):
        gmsh.model.addPhysicalGroup(surface[0], [surface[1]], outlet_marker)
        gmsh.model.setPhysicalName(surface[0], outlet_marker, "Fluid outlet")
    elif (
        np.isclose(com[2], 0)
        or np.isclose(com[1], B)
        or np.isclose(com[2], H)
        or np.isclose(com[1], 0)
    ):
        walls.append(surface[1])
    else:
        obstacles.append(surface[1])
gmsh.model.addPhysicalGroup(2, walls, wall_marker)
gmsh.model.setPhysicalName(2, wall_marker, "Walls")
gmsh.model.addPhysicalGroup(2, obstacles, obstacle_marker)
gmsh.model.setPhysicalName(2, obstacle_marker, "Obstacle")
The final step is to set mesh resolutions. We will use GMSH Fields to do this.
One can alternatively set mesh resolutions at points with the command gmsh.model.occ.mesh.setSize.
We start by specifying a distance field from the obstacle surface
distance = gmsh.model.mesh.field.add("Distance")
gmsh.model.mesh.field.setNumbers(distance, "FacesList", obstacles)
The next step is to use a threshold function vary the resolution from these surfaces in the following way:
LcMax -                  /--------
                     /
LcMin -o---------/
       |         |       |
      Point    DistMin DistMax
resolution = r / 10
threshold = gmsh.model.mesh.field.add("Threshold")
gmsh.model.mesh.field.setNumber(threshold, "IField", distance)
gmsh.model.mesh.field.setNumber(threshold, "LcMin", resolution)
gmsh.model.mesh.field.setNumber(threshold, "LcMax", 20 * resolution)
gmsh.model.mesh.field.setNumber(threshold, "DistMin", 0.5 * r)
gmsh.model.mesh.field.setNumber(threshold, "DistMax", r)
We add a similar threshold at the inlet to ensure fully resolved inlet flow
inlet_dist = gmsh.model.mesh.field.add("Distance")
gmsh.model.mesh.field.setNumbers(inlet_dist, "FacesList", [inlet])
inlet_thre = gmsh.model.mesh.field.add("Threshold")
gmsh.model.mesh.field.setNumber(inlet_thre, "IField", inlet_dist)
gmsh.model.mesh.field.setNumber(inlet_thre, "LcMin", 5 * resolution)
gmsh.model.mesh.field.setNumber(inlet_thre, "LcMax", 10 * resolution)
gmsh.model.mesh.field.setNumber(inlet_thre, "DistMin", 0.1)
gmsh.model.mesh.field.setNumber(inlet_thre, "DistMax", 0.5)
We combine these fields by using the minimum field
minimum = gmsh.model.mesh.field.add("Min")
gmsh.model.mesh.field.setNumbers(minimum, "FieldsList", [threshold, inlet_thre])
gmsh.model.mesh.field.setAsBackgroundMesh(minimum)
Before meshing the model, we need to use the syncronize command
gmsh.model.occ.synchronize()
gmsh.model.mesh.generate(3)
We can write the mesh to msh to be visualized with gmsh with the following command
gmsh.write("mesh3D.msh")
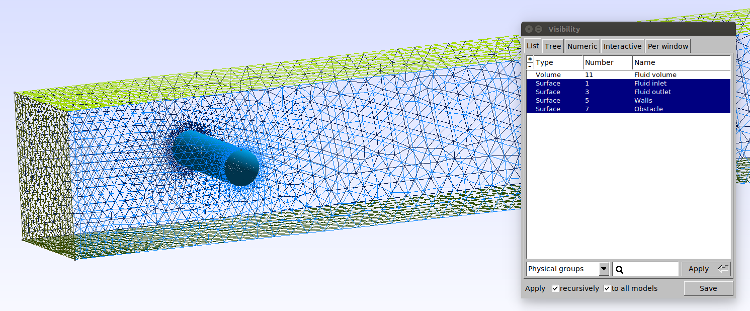
The mesh can be visualized in the GMSH GUI. The figure above visualized the marked facets of the 3D geometry.
In the next tutorials, we will learn two diffferent methods of loading this mesh into DOLFINx
2. How to load this mesh into DOLFINx without IO
In his tutorial, we will go through the steps of how to load the gmsh geometry above into DOLFINx, without using an intermediate file for storing mesh data.
Short tutorial
We use the utility functions from dolfinx.io.gmsh to read data directly from the GMSH model.
In this tutorial, we have been running gmsh on all processes activated with MPI.
However, this means that there is a gmsh mesh on each process. In DOLFINx, we would like to distribute this mesh over the active processes.
model_rank = 0
mesh_data = model_to_mesh(gmsh.model, MPI.COMM_WORLD, model_rank)
mesh = mesh_data.mesh
cell_tags = mesh_data.cell_tags
facet_tags = mesh_data.facet_tags
This function creates a mesh on processor 0 with GMSH and distributes the mesh data in a dolfinx.mesh.Mesh for parallel usage.
The flags cell_data and facet_data are booleans that indicates that you would like to extract cell and facet markers from the gmsh model.
The last flag gdim indicates the geometrical dimension of your mesh, and should be set to 2 if you want to have a 2D geometry.
Long tutorial
If you want to learn what the model_to_mesh function is actually doing (excluding MPI communication for distributing the mesh), the rest of this section will go through it step by step.
We start by using some convenience functions from DOLFINx to extract the mesh geometry (the nodes of the mesh) and the mesh topology (the cell connectivities) for the mesh.
x = extract_geometry(gmsh.model)
topologies, _physical_groups = extract_topology_and_markers(gmsh.model)
The mesh geometry is a (number of points, 3) array of all the coordinates of the nodes in the mesh. The topologies is a dictionary, where the key is the unique GMSH cell identifier. For each cell type, there is a sub-dictionary containing the mesh topology, an array (number_of_cells, number_of_nodes_per_cell) array containing an integer referring to a row (coordinate) in the mesh geometry, and a 1D array (cell_data) with mesh markers for each cell in the topology.
As an MSH-file can contain meshes for multiple topological dimensions (0=vertices, 1=lines, 2=surfaces, 3=volumes), we have to determine which of the cells has to highest topological dimension. We do this with the following snippet
# Get information about each cell type from the msh files
num_cell_types = len(topologies.keys())
cell_information = {}
cell_dimensions = numpy.zeros(num_cell_types, dtype=numpy.int32)
for i, element in enumerate(topologies.keys()):
    properties = gmsh.model.mesh.getElementProperties(element)
    name, dim, order, num_nodes, local_coords, _ = properties
    cell_information[i] = {"id": element, "dim": dim, "num_nodes": num_nodes}
    cell_dimensions[i] = dim
gmsh.finalize()

# Sort elements by ascending dimension
perm_sort = numpy.argsort(cell_dimensions)
We extract the topology of the cell with the highest topological dimension from topologies, and create the corresponding ufl.domain.Mesh for the given celltype
cell_id = cell_information[perm_sort[-1]]["id"]
cells = numpy.asarray(topologies[cell_id]["topology"], dtype=numpy.int64)
ufl_domain = ufl_mesh(cell_id, 3, dtype=x.dtype)
As the GMSH model has the cell topology ordered as specified in the MSH format,
we have to permute the topology to the FIAT format.
The permutation is done using the perm_gmsh function from DOLFINx.
num_nodes = cell_information[perm_sort[-1]]["num_nodes"]
gmsh_cell_perm = perm_gmsh(to_type(str(ufl_domain.ufl_cell())), num_nodes)
cells = cells[:, gmsh_cell_perm]
The final step is to create the mesh from the topology and geometry (one mesh on each process).
mesh = create_mesh(MPI.COMM_SELF, cells=cells, x=x, e=ufl_domain)
As the meshes can contain markers for the cells or any sub entity, the next snippets show how to extract this info to GMSH into dolfinx.MeshTags.
# Create MeshTags for cell data
cell_values = numpy.asarray(topologies[cell_id]["cell_data"], dtype=numpy.int32)
local_entities, local_values = distribute_entity_data(
    mesh, mesh.topology.dim, cells, cell_values
)
mesh.topology.create_connectivity(mesh.topology.dim, 0)
adj = adjacencylist(local_entities)
ct = meshtags_from_entities(mesh, mesh.topology.dim, adj, local_values)
ct.name = "Cell tags"

# Create MeshTags for facets
# Permute facets from MSH to DOLFINx ordering
# FIXME: This does not work for prism meshes
facet_type = cell_entity_type(
    to_type(str(ufl_domain.ufl_cell())), mesh.topology.dim - 1, 0
)
gmsh_facet_id = cell_information[perm_sort[-2]]["id"]
num_facet_nodes = cell_information[perm_sort[-2]]["num_nodes"]
gmsh_facet_perm = perm_gmsh(facet_type, num_facet_nodes)
marked_facets = numpy.asarray(topologies[gmsh_facet_id]["topology"], dtype=numpy.int64)
facet_values = numpy.asarray(topologies[gmsh_facet_id]["cell_data"], dtype=numpy.int32)
marked_facets = marked_facets[:, gmsh_facet_perm]
local_entities, local_values = distribute_entity_data(
    mesh, mesh.topology.dim - 1, marked_facets, facet_values
)
mesh.topology.create_connectivity(mesh.topology.dim - 1, mesh.topology.dim)
adj = adjacencylist(local_entities)
ft = meshtags_from_entities(mesh, mesh.topology.dim - 1, adj, local_values)
ft.name = "Facet tags"

# Output DOLFINx meshes to file

with XDMFFile(MPI.COMM_WORLD, "mesh_out.xdmf", "w") as xdmf:
    xdmf.write_mesh(mesh)
    xdmf.write_meshtags(ft, mesh.geometry)
    xdmf.write_meshtags(ct, mesh.geometry)
3. How to load msh files into DOLFINx
In the previous tutorial, we learnt how to load a gmsh python model into DOLFINx. In this section, we will learn how to load an “msh” file into DOLFINx.
We will do this by using the convenience function gmshio.read_from_msh
mesh_data = read_from_msh("mesh3D.msh", MPI.COMM_WORLD, 0, gdim=3)
mesh = mesh_data.mesh
cell_tags = mesh_data.cell_tags
facet_tags = mesh_data.facet_tags
What this function does, is that it uses the gmsh.merge command to create a gmsh model of the msh file and then in turn calls the gmsh_model_to_mesh function.
The read_from_msh function also handles MPI communication and gmsh initialization/finalization.
gmsh.initialize()
if MPI.COMM_WORLD.rank == 0:
    gmsh.model.add("Mesh from file")
    gmsh.merge("mesh3D.msh")
output = model_to_mesh(gmsh.model, MPI.COMM_WORLD, 0, gdim=3)
gmsh.finalize()